Export the Device Collections to CSV file which has zero members with Powershell

Hi Guys,

Recently we started clearing all the collections in Configuration Manager which has zero members count then i started looking for WMI classes to achieve this task.Below are the two WMI classes i have used in my powershell script.

  • SMS_Collection
  • SMS_DeploymentSummary

below is the script which i have used to achieve this task.

<#
.SYNOPSIS
   <A brief description of the script>
.DESCRIPTION
   <A detailed description of the script>
.PARAMETER <paramName>
   <Description of script parameter>
.EXAMPLE
   <An example of using the script>
#>

# to retrieve the collection details which has ZERo member count and Zero Deployments associated for that collection.

$ScriptPath = $MyInvocation.MyCommand.Path
$ScriptDir = Split-Path -parent $ScriptPath

Function Get-ColDetails
{
[cmdletbinding()]
    param(
    $SiteCode = '',
    $SiteServer= ''
    )
begin{}
Process
{

$query = "select * from SMS_Collection where CollectionType='2' AND MemberCount = '0'"

try{
$col = Get-WmiObject -Namespace "Root\SMS\Site_$($SiteCode)" -ComputerName $SiteServer -Query $query -ErrorAction Stop
}
catch
{
Write-Error $_.Exception.Message
}
   $array = @()

   foreach ($colID in $col) {            


    $depcount = Get-DeploymentCount -colID $colID.CollectionID -SiteCode $SiteCode -SiteServer $SiteServer
    
    $OutputObj  = New-Object -Type PSObject            
    $OutputObj | Add-Member -MemberType NoteProperty -Name CollectionID -Value $colID.CollectionID          
    $OutputObj | Add-Member -MemberType NoteProperty -Name Name -Value $colID.Name
    $OutputObj | Add-Member -MemberType NoteProperty -Name LimitToCollectionID -Value $colID.LimitToCollectionID
    $OutputObj | Add-Member -MemberType NoteProperty -Name LimitToCollectionName -Value $colID.LimitToCollectionName            
    $OutputObj | Add-Member -MemberType NoteProperty -Name MemberCount -Value $colID.MemberCount            
    $OutputObj | Add-Member -MemberType NoteProperty -Name CollectionVariablesCount -Value $colID.CollectionVariablesCount            
    $OutputObj | Add-Member -MemberType NoteProperty -Name ObjectPath -Value $colID.ObjectPath
    $OutputObj | Add-Member -MemberType NoteProperty -Name IsBuiltIn  -Value $colID.IsBuiltIn 
    $OutputObj | Add-Member -MemberType NoteProperty -Name TotalDepAssociated -Value $depcount
                
    $array+=$OutputObj            
   }  

}
end
{
if(Test-Path $ScriptDir\colinfo.csv -ErrorAction SilentlyContinue)
{
Write-Output "There is a previous Colinfo.csv file already exists, if you don't delete then content will be going to append to the Previous file"
Remove-Item -Path $ScriptDir\colinfo.csv -ErrorAction SilentlyContinue -Confirm -Verbose  
}
if($array)
{
$array  | where {$_.IsBuiltIn -ne "True"} | Export-Csv $ScriptDir\colinfo.csv -NoTypeInformation -Append -Force -ErrorAction SilentlyContinue
}
}
}


Function Get-DeploymentCount([String]$colID,[String]$SiteCode,[string]$SiteServer)
{

$query = "select * from SMS_DeploymentSummary where CollectionID='$colID'"

$depSum = Get-WmiObject -Namespace "Root\SMS\Site_$($SiteCode)" -ComputerName $SiteServer -Query $query

return $depSum.Count

}


Hope this helpful to you.

Please feel free to comment if you have any doubts . 🙂
SCCM – Powershell – CCMCache Cleanup

Hi Guys,

Below script will be helpful for you to cleanup your CCMCache Folder.There are multiple ways you can deploy this script to your endpoints.

In my company i have used SCCM CI to deploy this script. I am not going to show you how to create CI in SCCM because there are many blogs will talk about it in detailed.

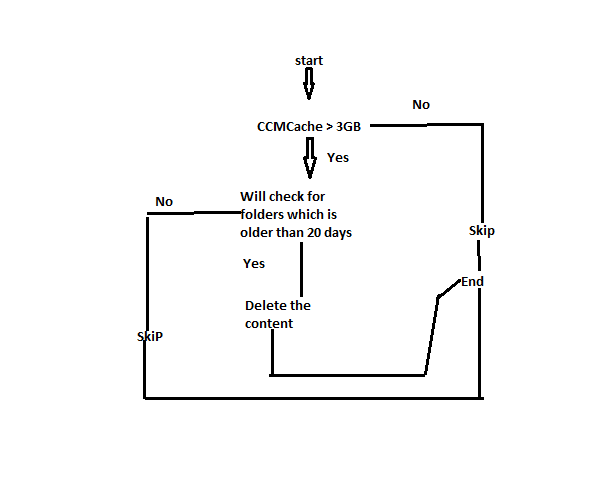
Script will start the delete the folders based on below criteria:

Flow

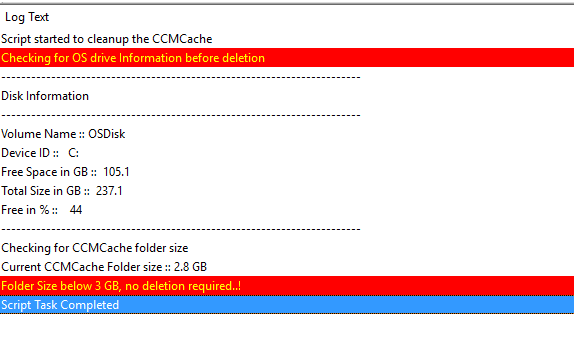
Script output:

Del1


This script will create a log file to verify the which folders are going to delete and C drive information before & after delete, this way you can see the how much free space avilable after deletion.


<#
    .SYNOPSIS
        Script for CCMCache Cleanup
    
    .DESCRIPTION
        This Script will help you to perform the CCMCache Cleanup. This will remove the folders which is older than 20 days.
    
    .EXAMPLE
        Clean-CCMCache
    
    .NOTES
        ===========================================================================
        Created on:       5/18/2017
        Created by:       Madhu Sunke
        Organization:     <Company Name>
        Filename:         Clean-CCMCache.ps1
        ===========================================================================
#>

function Clean-CCMCache
{

if(Test-Path -Path C:\wbg\Logs\CCMCacheCleanup.log -ErrorAction SilentlyContinue)
{
Remove-Item C:\wbg\Logs\CCMCacheCleanup.log -Force -ErrorAction SilentlyContinue
}


Write-Log -Message "Script started to cleanup the CCMCache" -severity 1 -component "Script Start"

Write-Log -Message "Checking for OS drive Information before deletion" -severity 3 -component "Script Start"

Get-DiskInfo # calling disk info

Write-Log -Message "Checking for CCMCache folder size" -severity 1 -component "Information"


$FolderSize = Get-Size -Path "C:\Windows\ccmcache\"

Write-Log -Message "Current CCMCache Folder size :: $FolderSize GB" -Severity 1 -component "Information"

if($FolderSize -gt 3)
{
$MinDays = 20

Write-Log -Message "Checking for the folders which is older than $MinDays days" -severity 1 -component "Information"

$UIResourceMgr = New-Object -ComObject UIResource.UIResourceMgr

$Cache = $UIResourceMgr.GetCacheInfo()

$cacheItems = ($Cache.GetCacheElements() |
where-object {[datetime]$_.LastReferenceTime -lt (get-date).adddays(-$mindays)})

if($cacheItems)
{

$count = $cacheItems | Measure-Object | select -ExpandProperty count

Write-Log -Message "Total no.of folders exists $count" -severity 1 -component "Information"

Write-Log -Message "------------------------------------------------------------------------" 

Write-Log -Message                   "The below content are going to be removed" 

Write-Log -Message "------------------------------------------------------------------------" 

$cacheItems | % { Write-Log -Message $_.location }

Write-Log -Message "------------------------------------------------------------------------" 

try
{
$cacheItems |foreach {
$Cache.DeleteCacheElement($_.CacheElementID)}
$flag = $true
}
catch
{
Write-Log -Message $_.Exception.Message -Severity 1 -component "Error"
exit
}
Start-Sleep 60

$FolderSize = Get-Size -Path "C:\Windows\ccmcache\"

Write-Log -Message "Current CCMCache Folder size After deletion :: $FolderSize GB" -Severity 1 -component "Information"

Write-Log -Message "Final Check for OS Drive information" -severity 3 -component "Information"
Get-DiskInfo # calling disk info
}
else
{
Write-Log -Message "There is no folders exists which is older than 20 days based on LastReferenceTime Property..!" -severity 1 -component "Information"
Write-Log -Message "Deletion not required" -severity 3 -component "Information"
}

}
else
{
Write-Log -Message "Folder Size below 3 GB, no deletion required..!" -severity 3 -component "Information"
}
Write-Log -Message "Script Task Completed" -severity 1 -component "Script End"
}

function Get-Size([string]$Path)
{

if(Test-Path -Path $Path -ErrorAction SilentlyContinue) 
{
$fSize = ((gci -path $Path -recurse | measure-object -property length -sum).sum /1gb) 

return [math]::Round($fSize,1)
}
else
{
Write-Log -Message "No such Path $Path exists on $env:COMPUTERNAME" -severity 3 -component "Error"
Write-Log -Message "Checking for OS Drive information" -severity 1 -component "Information"
Get-DiskInfo # calling disk info
Write-Log -Message "Script Task Completed" -severity 1 -component "Script End"
exit
}
}

function Get-DiskInfo
{

$disks = Get-WmiObject -Class Win32_LogicalDisk -ComputerName localhost -Filter "drivetype=3"

        if ($disks) {
            
Write-Log -Message "------------------------------------------------------------------------" 

Write-Log -Message                   "Disk Information"

Write-Log -Message "------------------------------------------------------------------------" 

            
            Foreach ($disk in $disks) {

                Write-Log -Message "Volume Name :: $($disk.VolumeName)" -severity 1 -component "Information"

                Write-Log -Message "Device ID ::   $($disk.DeviceID)" -severity 1 -component "Information"
                Write-Log -Message "Free Space in GB ::  $([math]::Round(($disk.FreeSpace / 1GB),1))" -severity 1 -component "Information"
                Write-Log -Message "Total Size in GB ::  $([math]::Round(($disk.Size / 1GB),1))" -severity 1 -component "Information"
                try{
                Write-Log -Message "Free in % ::    $([math]::Round(($disk.FreeSpace / $disk.Size)*100))" -severity 1 -component "Information"
                }
                Catch [System.DivideByZeroException] 
                {
                Write-Log -Message "Divide by zero is not allowed" -severity 3 -component "Error"
                }
}
Write-Log -Message "------------------------------------------------------------------------"
}

}

Function Write-Log
{
 
    PARAM(
         [String]$Message,
         [String]$Path = "C:\wbg\Logs\CCMCacheCleanup.log",
         [int]$severity,
         [string]$component
         )
         
         $TimeZoneBias = Get-WmiObject -Query "Select Bias from Win32_TimeZone"
         $Date= Get-Date -Format "HH:mm:ss.fff"
         $Date2= Get-Date -Format "MM-dd-yyyy"
         $type=1
         
         ""| Out-File -FilePath $Path -Append -NoClobber -Encoding default 
}

if($flag){return $true}

Clean-CCMCache 

Thanks for reading !!!

Please feel free to comment if any clarification required on this script.

How to resolve the issue when your retrieving the LAPS password using Powershell cmdlet’s

Hi Guys,

Today i had an issue while we are retrieving the LAPS password using powershell cmdlets on windows 10 Anniversary update machines. But i didn’t get any clue why it was throwing an error but it was fine before when i was with Windows 1511 version.

LAPS

I just copied the same error which was returned by the powershell  and gone through the google. The first link itself explaining about the issue with LAPS on Windows 1607 machines.

https://social.technet.microsoft.com/Forums/windows/en-US/1f2bde5b-6654-47da-8d10-c2237653bcf7/laps-powershell-command-not-working-in-windows-10-anniversary-build?forum=win10itprogeneral

To resolve this issue , just you need to update the LAPS version to 6.2 and it was an MSI you can directly download from the MS download center.

https://www.microsoft.com/en-us/download/details.aspx?id=46899

More about LAPS version 6.2

https://blogs.msdn.microsoft.com/laps/2016/09/29/laps-updated-to-6-2-0/

Hope this will help you resolve powershell error when you are accessing LAPS password.

See you until next update. Sincerely – EndUserComputing Team

How to read Windows Update logs in Windows 10

In Windows 10, Windows Update client uses Event Tracing for Windows (ETW) to generate diagnostic logs. This method improves performance and reduces disk space usage. However, the logs are not immediately readable as written.

Like windows 7 , WindowsUpdate.log will not store all the logging information about Windows update client transactions. if you open and see that log it will just refer the PowerShell cmdlet.

1

The below path , where windows update client will store the ETL files. (C:\Windows\Logs\WindowsUpdate)

2

To decode the resulting ETL files and create a single, text based log file, you can run the new Windows PowerShell cmdlet Get-WindowsUpdateLog. After you run this command, your ETL files will be decoded into a readable text log that is placed on the current user’s desktop.

Run the PowerShell in Admin Mode and execute the Get-WindowsUpdateLog , for more information about this Cmdlet please run the Get-Help Get-WindowsUpdateLog  -ShowWindows

3

The above cmdlet will decode all the ETL files located in C:\Windows\Logs\WindowsUpdate and sends the output to plain text file .

4

we can generate the windows update log for remote computers by pointing the ETL path.

Here is an example

Get-WindowsUpdateLog -ETLPath \\ED10RC3-HIPS\C$\windows\Logs\WindowsUpdate -LogPath C:\Wbg\logs\windowsupdate[PCNAME].log

5

It will create our traditional log information for Windows updates. Just execute “invoke-item C:\WBG\Logs\windowsupd.log” to open the Log file.

Happy Learning 🙂

Regards – EUC Team.

Powershell Splatting

I can say splatting is a very good option to use in powershell instead of writing very long lines containing multiple parameters.  While you can format with (`) backticks, they can introduce as many problems as they solve.

I will show you an example ,how we can use splatting in Powershell.

Lets see the below powershell code to retrieve Logical disk info by using Win32_LogicalDisk.

Get-WmiObject -Class Win32_LogicalDisk -ComputerName $computer -Filter "DriveType=3"

above one liner code will display the Total avilable and free drive space of a machine where drivetype =3.

capture

to know more about Win32_LogicalDisk class , please click the below click

https://msdn.microsoft.com/en-us/library/aa394173(v=vs.85).aspx

Lets see how we can implement same one liner with powershell splatting.

You can use a hashtable to define parametername – value pairs like this:

$params = @{class=win32_logicaldisk  
           computername=localhost  
           filter=’drivetype=3’ 
           }

While the function is called $params, when you “splat” substitute @ for $, [@params not $params] and in this way unleash the hashtable’s Key = ‘Value’ pairs.

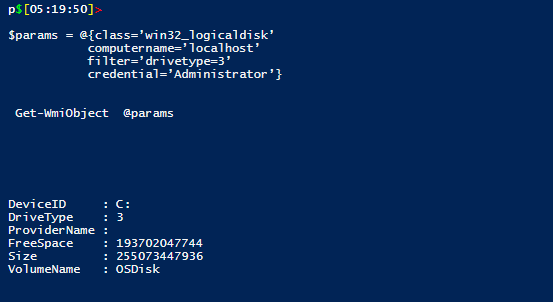
 Get-WmiObject  @params

Lets execute our defined parameters with Get-WMIobject cmdlet.

2

Summary of PowerShell Splatting

Used with a bit of care splatting are a good way to save typing.

Another benefit of this technique is that it gives you an excuse to employ more advanced techniques such as hashtables and functions.

PowerShell script to retrieve the last boot time and uptime for the remote machines

Hi guys ,

Today i am going to explain you about , how retrieve the last  boot time and up time for the remote machines by using WMI class win32_operatingsystem.

you can use the below script to get those details from remote computers and also script has ability to pass the different set of credentials by using -credentials parameter inorder to retrieve the WMI information.

<#
.SYNOPSIS
   <A brief description of the script>
.DESCRIPTION
   <A detailed description of the script>
.PARAMETER <paramName>
   <Description of script parameter>
.EXAMPLE
   <An example of using the script>
#>

Function Get-Uptime { 
    [CmdletBinding()] 
    param ( 
        [Parameter(Mandatory=$false, 
                        Position=0, 
                        ValueFromPipeline=$true, 
                        ValueFromPipelineByPropertyName=$true)] 
        [Alias("Name")] 
        [string[]]$ComputerName=$env:COMPUTERNAME, 
        $Credential = [System.Management.Automation.PSCredential]::Empty 
        ) 
 
    begin{} 
 
    #Need to verify that the hostname is valid in DNS 
    process { 
        foreach ($Computer in $ComputerName) { 
            try { 
               
                $hostdns = [System.Net.DNS]::GetHostEntry($Computer) 
                Write-Verbose "Fetching Info from $($Computer)...Please Wait!!!"
                $OS = Get-WmiObject win32_operatingsystem -ComputerName $Computer -ErrorAction Stop -Credential $Credential 
                $BootTime = $OS.ConvertToDateTime($OS.LastBootUpTime) 
                $Uptime = $OS.ConvertToDateTime($OS.LocalDateTime) - $boottime 
                $propHash = [ordered]@{ 
                    ComputerName = $Computer 
                    BootTime     = $BootTime 
                    Uptime       = $Uptime 
                    } 
                $objComputerUptime = New-Object PSOBject -Property $propHash 
                $objComputerUptime | FL
                }  
            catch [Exception] { 
                Write-Output "$computer $($_.Exception.Message)" 
                #return 
                } 
        } 
    } 
    end{} 
}

 How it works : for single computer

11

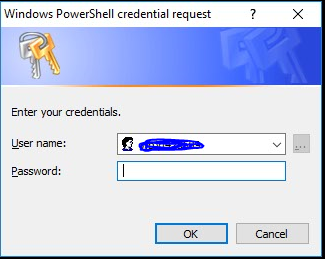
 Here I used -credential parameter to pass my admin account to access the WMI info from remote computer.


As soon as you press enter , it will pop up and will ask your admin account credentials

22

Provide the UserName and Password , then you will get the BootTime and LastUp time Details.

33

 How it works : for single computer

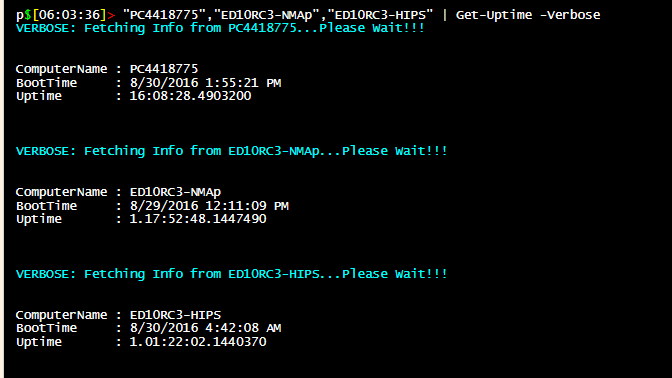
This script will accepts the multiple host names in order to retrieve the WMI information. you just need to pass the multiple machine names to get-uptime cmdlet.

5

What will happen if you are passing the Wrong Host Name, for that i have implemented try-catch mechanism and also verifying the DNS entry check.

 $hostdns = [System.Net.DNS]::GetHostEntry($Computer) 

First it will check DNS try , if its exists then it will fetch the WMI info or else it just calls the Catch block with appropriate Exception Message.


That’s all for today. Happy Learning 🙂

How to remove multiple snapshots from the list by using Powershell(SCVMM)

Hi guys ,

Sorry , now a days i was busy with my office work and couldn’t able to post any of my updates.

Today, just want to share about small powershell snippet, which will remove VM  checkpoints for the given VM name.

By using the below code , you can remove the multiple snapshots without opening the SCVMM console.

<#
.SYNOPSIS
   <A brief description of the script>
.DESCRIPTION
   <A detailed description of the script>
.PARAMETER <paramName>
   <Description of script parameter>
.EXAMPLE
   <An example of using the script>
#>

$MachineName = Read-Host "enter the VM Name" 

try{
$VMCheck = get-VMCheckpoint -VM $MachineName | Select Name,CheckpointID |Out-GridView -Title "Avilable snapshots for $($MachineName)" -OutputMode Multiple

foreach($snap in $VMCheck)
{

 get-VMCheckpoint -VM $MachineName | where {$_.CheckpointID -eq $snap.CheckpointID} | Remove-VMCheckpoint -RunAsynchronously -Confirm -Verbose

} 
}
catch
{
Write-Host $_.exception.message
}


Before executing the script, let’s verify how many snaps are available to that particular VM in SCVMM console

1

How it works: just copy and paste the above code in PowerShell ISE console and click Run button.

It will prompt for the VM name , just enter the VM name (Make sure you are entering the correct VM Name or else it will throws an error)

2

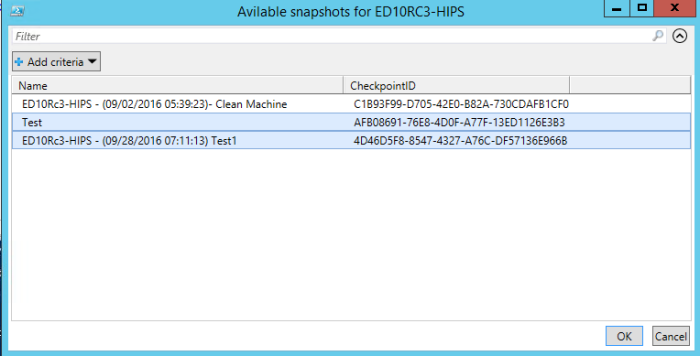
Just press enter after entering the correct VM Name and it will give you nice GUI to select multiple snaps to delete.

3

Now you can select the Multiple entries. Just select the Snap Name which you are going to delete and click OK.

In this example , I am selecting both Test and Test1 snaps. Let’s see whether script can able to delete that snaps.

Now you can see the confirmation window asking for removing that snapshot. Click Yes.

Yes, script working as expected and it moved both snaps from that particular VM.

6

Let’s cross verify , just open the SCVMM console and see whether it removed those Test and Test1 snaps form ED10RC3-HIPS Machine.

7

Yes it’s removed the both snaps from ED10RC3-HIPS.

Happy Learning 🙂

Retrieve the RAM information from remote computers by using WMI + Powershell

This Script will retrieve the data from remote computers about RAM information and save it in excel. In this script we are Executing WMI query on remote PC’s for Retrieving the Actual RAM installed.We can pass the Multiple computers for Script Execution. Error Handling implemented via try-catch mechanism.

I Have uploaded script in Microsoft Repository , you can also download from the below web link.

Download Script from Technet


Happy Learning 🙂 – EnduserComputing Team

New Look for software center in Configuration Manager 1511

Hi Guys ,

How are you doing , Hope all are doing good.

Okay let move on the topic , toady will see how we can enable the new software center GUI in configuration manager 1511.

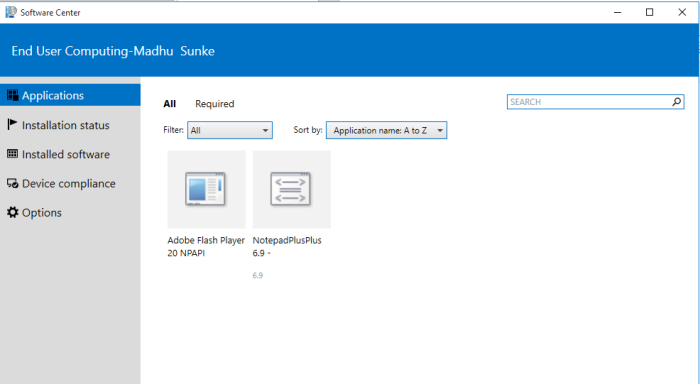
New GUI will looks like below

SC1511

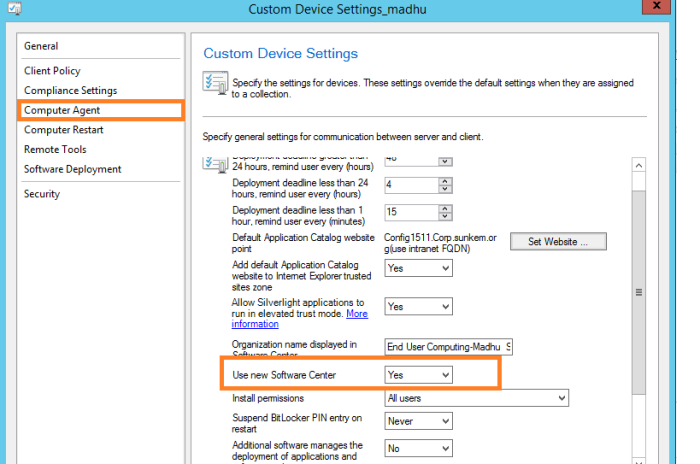
How to enable this feature in configuration manager Console.

In Left side pane select Administration -> Client Settings -> Device Settings.

SC1511-2

still if you are unable to see the changes in GUI even after modifying the device settings, In this case just try to run the machine policies and then restart the software center.

Want to know more about this new changes in CM1511 , please go through the below link.

https://technet.microsoft.com/en-us/library/mt622084.aspx

Happy Learning 🙂

End User Computing Team.